Defining VPN Zones
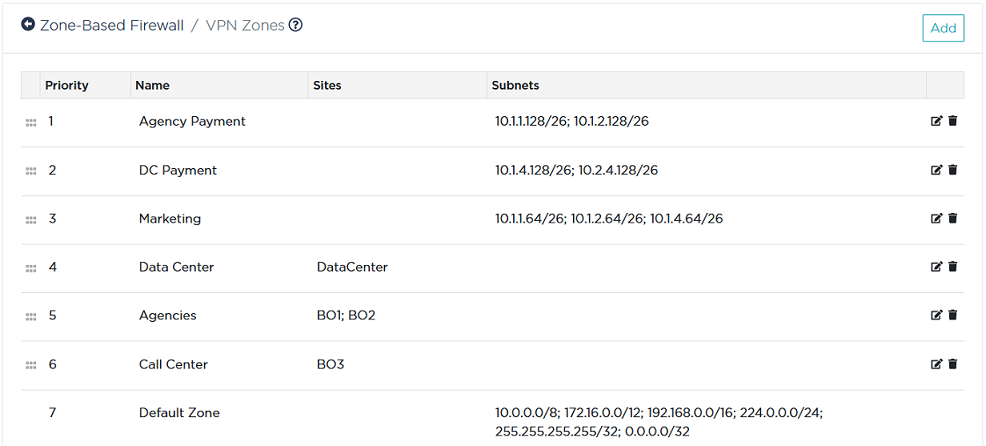
Refer to "Use Case 11" diagram where 6 zones are defined:
|
•
|
Default Zone: this zone contains all the subnets of the private IP address range. This zone is configured by default and cannot be modified. |
|
•
|
Data Center: geographical zone that contains all the subnets of the Data Center site (DataCenter and DataCenter2); these subnets are not included in higher priority zones. |
|
•
|
Agencies: geographical zone that contains all the subnets of the Agency sites (B01, B02); they are not included in higher priority zones. |
|
•
|
Call Center: geographical zone that contains the subnets of the B03 site; they are not included in higher priority zones. |
|
•
|
DC Payment: logical zone that contains sets of subnets that may belong to one or several sites. DC Payment subnets are included in the Data Center zone (DataCenter and DataCenter2). |
|
•
|
Agency Payment: logical zone that contains sets of subnets that may belong to one or several sites. Agency Payment subnets are included in the Agencies zone (B01 and B02). |
|
•
|
Marketing: logical zone that contains sets of subnets that may belong to one or several sites. Marketing subnets are included in both the Agencies zone and DataCenter zone (B01, B02 and DataCenter). |
Note: High priority VPN zones are included in low priority VPN zones.
Warning: for system performance reasons, do not define more than 30 VPN zones. Also favor subnet definition over site hosts selection (/32).

Defining the Agencies zone
|
1
|
In the VPN Segmentation Policies panel of the Zone-Based Firewall window, click the  button. button. |
The Default Zone with its subnets is already displayed. You cannot modify it.
|
2
|
Click  in the top right corner of the window to view the VPN Zone form. in the top right corner of the window to view the VPN Zone form. |
|
3
|
Type 'Agencies' as the Name of the zone. |
|
4
|
Enter a low Priority (5) for this zone because it is clearly identified with no subnet overlap. 1 corresponds to the highest priority, 6 is the lowest priority value. |
Note: at any time, you may change the priority of a VPN zone by positioning the cursor over the  icon and dragging the line to the desired position. The priority values of all the VPN zones automatically adjust to the new list order.
|
5
|
From the Sites list which includes all the Sites you have configured in "Use Case 1", move B01 and B02 Sites to the right list through the middle arrow bar. |
Note that you can find a specific Site through the Search fields.
You do not need to specify Subnets since identification was done via Site Names.
|
6
|
Click Create to validate. |
Defining the Call Center zone
|
1
|
In the VPN Segmentation Policies panel of the Zone-Based Firewall window, click the  button. button. |
|
2
|
Click  in the top right corner of the window to view the VPN Zone form. in the top right corner of the window to view the VPN Zone form. |
|
3
|
Type 'Call Center' as the Name of the zone. |
|
4
|
Enter a low Priority (6) for this zone because it is clearly identified with no subnet overlap. 1 corresponds to the highest priority, 6 is the lowest priority value. |
|
5
|
From the Sites list which includes all the Sites you have configured in "Use Case 1", move the B03 Site to the right list through the middle arrow bar. |
Note that you can find a specific Site through the Search fields.
|
6
|
Click Create to validate. |
Defining the Data Center Zone

|
1
|
In the VPN Segmentation Policies panel of the Zone-Based Firewall window, click the  button. button. |
|
2
|
Click  in the top right corner of the window to view the VPN Zone form. in the top right corner of the window to view the VPN Zone form. |
|
3
|
Type 'Data Center' as the Name of the zone. |
|
4
|
Enter a low Priority (4) for this zone because it is clearly identified with no subnet overlap. |
|
5
|
DataCenter and DataCenter2 are two ip|engines on the same Site named DataCenter ("Use Case 1"). From the Sites list which includes all the Sites you have configured, move the DataCenter Site to the right list through the middle arrow bar. |
Note that you can find a specific Site through the Search fields.
|
6
|
Click Create to validate. |
Defining the DC Payment zone
|
1
|
In the VPN Segmentation Policies panel of the Zone-Based Firewall window, click the  button. button. |
|
2
|
Click  in the top right corner of the window to view the VPN Zone form. in the top right corner of the window to view the VPN Zone form. |
|
3
|
Type 'DC Payment' as the Name of the zone. |
|
4
|
Enter a high Priority value (2) for this zone because of the acuteness of its subnet definition. |
|
5
|
Use the Subnets panel to identify DC Payment two subnets: 10.1.4.128/26 and 10.2.4.128/26. |
|
6
|
Click Create to validate. |
Defining the Agency Payment zone
|
1
|
In the VPN Segmentation Policies panel of the Zone-Based Firewall window, click the  button. button. |
|
2
|
Click  in the top right corner of the window to view the VPN Zone form. in the top right corner of the window to view the VPN Zone form. |
|
3
|
Type 'Agency Payment' as the Name of the zone. |
|
4
|
Enter a high Priority value (1) for this zone because of the acuteness of its subnet definition. |
|
5
|
Use the Subnets panel to identify Agency Payment two subnets: 10.1.1.128/26 and 10.1.2.128/26. |
|
6
|
Click Create to validate. |
Defining the Marketing zone

|
1
|
In the VPN Segmentation Policies panel of the Zone-Based Firewall window, click the  button. button. |
|
2
|
Click  in the top right corner of the window to view the VPN Zone form. in the top right corner of the window to view the VPN Zone form. |
|
3
|
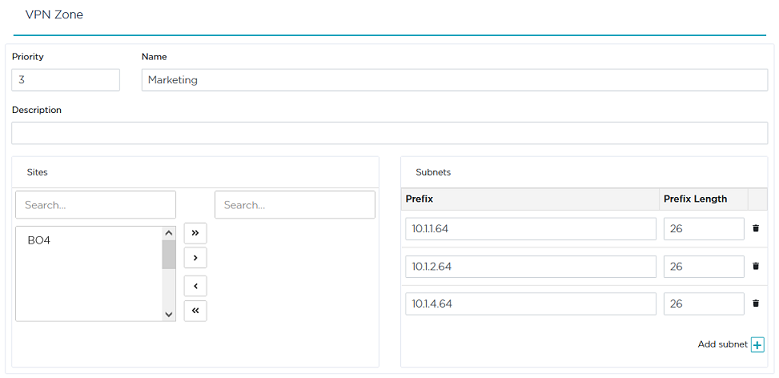
Type 'Marketing' as the Name of the zone. |
|
4
|
Enter an average Priority value (3) for this zone. |
|
5
|
Use the Subnets panel to identify the Marketing zone three subnets: 10.1.1.64/26, 10.1.2.64/26 and 10.1.4.64/26. |
|
6
|
Click Create to validate. |
Modifying or deleting a VPN Zone
In the Zone-Based Firewall / VPN Zones window:
|
•
|
Click  to edit the configuration of a VPN zone. Modify any values and press to edit the configuration of a VPN zone. Modify any values and press  to save your settings. to save your settings. |
|
•
|
Click  if you want to delete a VPN zone. The system asks you to click the icon a second time to confirm your action. if you want to delete a VPN zone. The system asks you to click the icon a second time to confirm your action. |
After you have defined your VPN zones, you must apply VPN Segmentation Policies to these zones.

 button.
 in the top right corner of the window to view the VPN Zone form.
 icon and dragging the line to the desired position. The priority values of all the VPN zones automatically adjust to the new list order.
 button.
 in the top right corner of the window to view the VPN Zone form.
 button.
 in the top right corner of the window to view the VPN Zone form.
 button.
 in the top right corner of the window to view the VPN Zone form.
 button.
 in the top right corner of the window to view the VPN Zone form.
 button.
 in the top right corner of the window to view the VPN Zone form.
 to save your settings.