Configuring the LAN
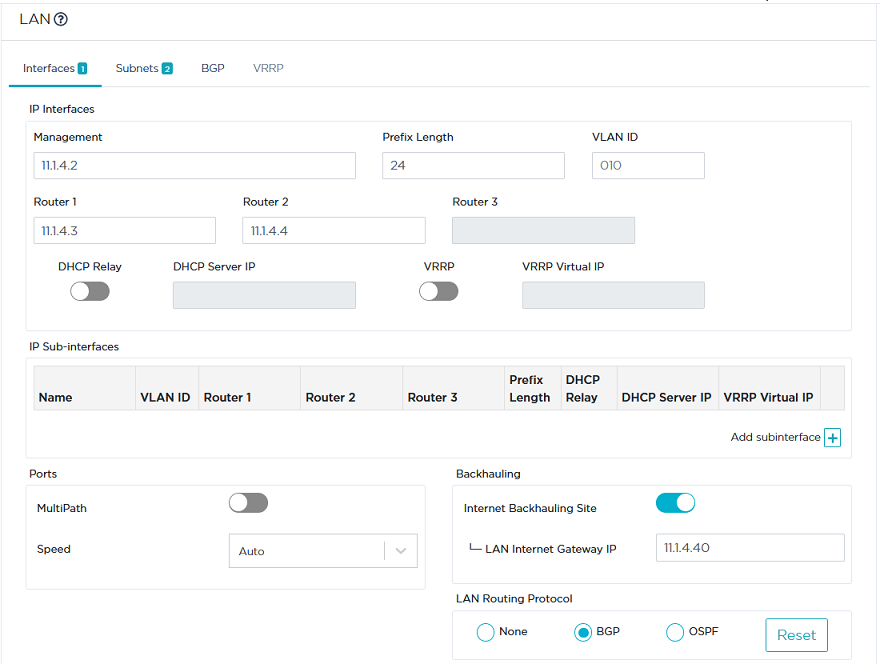
As a second step, configure the Data Center LAN which includes one physical interface.
Refer to "Use Case 2" diagram where the LAN information is displayed in blue.
|
1
|
Click the Interfaces tab. |
|
2
|
Enter the ip|engine Management IP address (11.1.4.2), Prefix Length (24). |
The Management IP address is used for communicating with other ip|engines, the ZTP Server and the Orchestrator.
|
3
|
Use the default Auto Generated option (creation window only) to let the system allocate LAN addresses automatically to the Routers (Router X IP = Management IP + X) linked to the WANs that you will configure for this ip|engine. Also refer to "IP Address allocation". |
In this example, Router 1 and Router 2 IP addresses will be automatically defined as they respectively correspond to WAN1 and WAN2.
|
4
|
Do not activate the DHCP Relay function since the Data Center hosts can directly access the DHCP Server. The ip|engine does not need to relay host requests. |
|
5
|
Do not enter any VLAN ID. Note that the grey values appearing in some fields of the interface are only given as examples and are not taken into account in the configuration. |
|
6
|
Do not use High Availability. |
|
7
|
Leave the Speed parameter to Auto to let the system define the speed of the interface, or you can force the speed to 100FD or 1000FD. The full duplex speed is expressed in megabits per second. |
|
8
|
Define this Data Center hub ip|engine as a Backhauling Site. This means it can receive Internet traffic through the overlay and route it to a firewall in the LAN: specify the LAN Internet Gateway IP address as 11.1.4.40 |
|
9
|
Select BGP as LAN Routing Protocol. |
The following window displays the validated settings.

Defining additional Subnets

In Use Case 2, there is one additional subnet you must specify because the system is unable to detect it automatically. Subnets enable you to classify, measure and control the traffic coming from and going to specific hosts and servers.
|
10
|
Click the Subnets tab and the Add subnet icon  . . |
|
11
|
Define the additional subnet by entering its prefix (11.1.5.0), prefix length (24) and next hop (11.1.4.251). The Next Hop field enables you to define the route from the BGP local peer router (see below) to the Data Center in the private area of the network, where addresses are not NATted and cannot be identified automatically. |
Note: The Next Hop field is optional and you can leave it empty if you enable BGP or OSPF.
Also note that the number of subnets is incremented on the tab.
|
12
|
The Data Center ip|engine exchanges its routing tables with the local router using either BGP or OSPF. Refer to the following procedures which are mutually exclusive. |
Configuring BGP
The Data Center ip|engine exchanges its routing tables with the local router using BGP.

|
1
|
Click the BGP tab and the Add peering icon  . . |
|
2
|
Enter the IP address of the BGP local peer (11.1.4.251). |
Configuring OSPF
|
1
|
In the Interfaces window, select OSPF as the LAN Routing Protocol. |
|
2
|
Click the Add subinterface icon  . Enter 11 as VLAN ID, 11.1.11.3 as the sub-interface IP address for Router 1, 11.1.11.4 as the sub-interface IP address for Router 2 and 24 as Prefix Length. Each VLAN corresponds to an OSPF network area. . Enter 11 as VLAN ID, 11.1.11.3 as the sub-interface IP address for Router 1, 11.1.11.4 as the sub-interface IP address for Router 2 and 24 as Prefix Length. Each VLAN corresponds to an OSPF network area. |


|
4
|
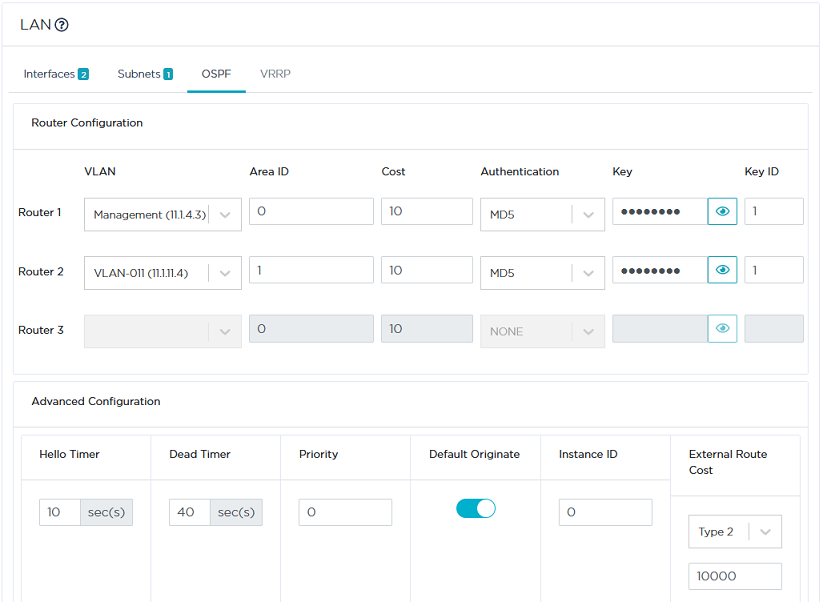
Configure Router 1 and Router 2 as follows: |
|
•
|
VLAN: for Router 1, select the 'None' option to take into account the ip address of the router. For Router 2, select VLAN ID 11 you defined in the previous step. |
|
•
|
Area ID: by default, Area 0 which is the backbone area or the core of the OSPF network. It corresponds to the area including the CE router. All other areas are connected to it and all the traffic between areas must traverse it. |
In this example, keep the 0 default value for Router 1 and enter 1 as Area 1 ID for Router 2.
|
•
|
Cost: use the 10 default value which corresponds to the interface cost of Router 1 (11.1.4.3) and of Router 2 (11.1.4.4). |
|
•
|
Authentication: for each router, select one authentication method among MD5, SHA1, HMAC SHA256, HMAC SHA384 and HMAC SHA512. By default, there is no authentication (NONE option). |
|
•
|
Key: for each router, enter your authentication password. Use the  icon different statuses to either display or hide the key. icon different statuses to either display or hide the key. |
|
•
|
Key ID: for each router, enter 1 as the password identifier. This value must match the key ID of the Core Router password. |
|
5
|
Specify OSPF Advanced Configuration parameters which are common to all the routers: |
|
•
|
Hello Timer: time between each Hello packet sent by the router to the interface(s). Hello packets enable the system to establish adjacencies and router keepalive messages to notify neighbors that links are up and active. |
|
•
|
Dead Timer: time after the last Hello packet is sent by a router and before the router is considered as dead. Dead Timer cannot be smaller than Hello Timer x 3. |
|
•
|
Priority: with the Broadcast network type (only network type supported), the network elects one Designated Router (DR) and one Backup Designated Router (BDR). They are in charge of transferring topology modifications to all the routers of the area. The priority mechanism determines which router is DR and which one is BDR. |
The router with the highest priority value is the DR router which is the main router for distributing the routes. If both DR and BDR routers have the same priority value, the router with the highest IP address is selected as the DR. In the current example, keep the 0 default value, i.e. this router is neither DR nor BDR (it does not participate in the election).
|
•
|
Default Originate: only check this option if you want to redistribute a default route through OSPF. |
|
•
|
Instance ID: set this field to 0 to ensure this parameter is not currently used by routers. |
Also see how to configure:
a multi-ip|engine Data Center
a Branch Office ip|engine LAN
a multi-ip|engine Branch Office Site


